EmbVision Tutorial: Part 6
Video Stream Processing - Raspberry Pi™ -
Shogo MURAMATSU, Associate Prof.,
Dept. of Electrical and Electronics Eng., Faculty of Eng., Niigata Univ.
Copyright (c), All rights reserved, 2014-2015, Shogo MURAMATSU
Contents
Summary
Through this exercise, you can learn how to implement the Simulink model developed in Exercise Part5 on Raspberry Pi and simulate it in the external mode. As well, you can also experiment the stand alone execution.
Settings of Raspberry Pi
From Simulink model, one can generate a code for Raspberry Pi, a single board computer.
Note that this exercise is available only for MATLAB on Windows®.
In the followings, it is assumed the support package for Raspberry Pi has already been installed.
[ Top ]
Simulation Model
First, revise the Simulink model "videgradfilt" developed in Exercise Part 5 for Raspberry Pi
Open the "videogradfilt" model and save it as "videogradfiltraspi".
open_system('videogradfilt')
save_system('videogradfilt','videogradfiltraspi')
All the blocks in a Simulink model targeted to Raspberry Pi should be available for code generation. Furthermore, input and output blocks should be selected from the block library for Raspberry Pi.
The block library for Raspberry Pi can be opened by selecting
- Simulink Support Package for Raspberry Pi hardware
from the Simulink library browser.
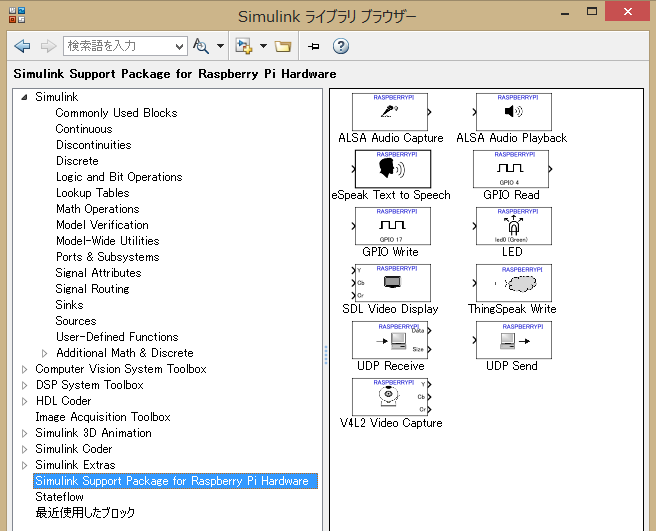
Otherwise, one can execute the
raspberrypilib
function on the MATLAB®'s command window.
Let us replace the video input/output blocks for Raspberry Pi.
- "From Multimedia File" "RGB to Gray" -> "V4L2 Video Capture"
- "To Multimedia File!" -> "SDL Video Display"
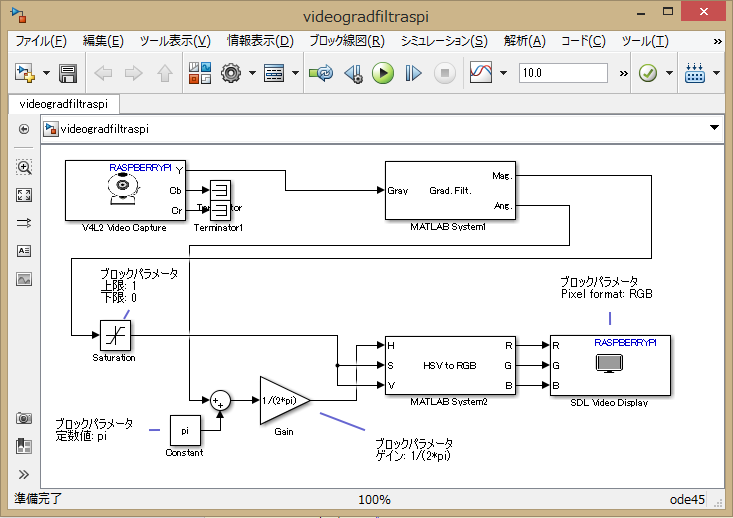
The output Y of the "V4L2 Video Capture" block corresponds to the grayscale. In this model, because the rest Cb and Cr components are not used, the termination blocks are connected to the ports.
The block parameter "Pixel format" was edited to RGB so that the "SDL Video Display" can accept data in RGB format.
Run the model.

Unfortunately, a part of the "SDL Video Display" produces an error due to the data type mismatch at the block inputs.
The reason for this problem is that the "SDL Video Display" requires 8-bit unsigned integer (uint8), although the "HSV to RGB" block outputs a data in double type.
In order to avoid this problem, insert the block that adjusts the gain and the block that converts the data type, i.e.,
to before the input port of the "SDL Video Display" block.

Processing for a dummy video is executed without any error.
Here, note that
- The "V4L2 Video Capture" block output a transposed video,
- The "SDL Video Display" block displays a transposed video.
In order to verify this fact, connect the
- To Video Display block (only available for Windows®)
in "Computer Vision System Toolbox/Sinks" to output port Y of the "V4L2 Video Capture" block.
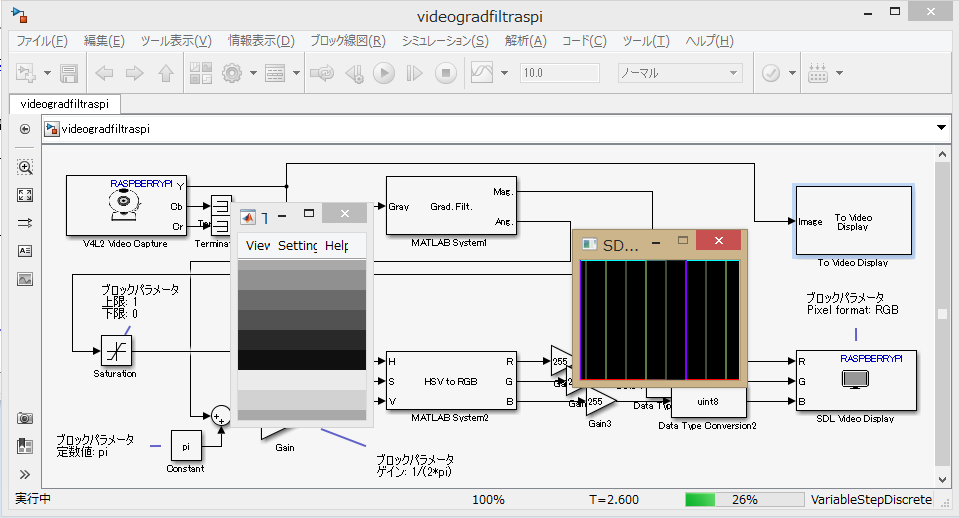
Running the simulation reveals that the output of "V4L2 Video Capture" and that of "SDL Video Display" are transposed from one another.
Thus, the direction of the gradient filter should be revised. Let the Kernel property of the "Filt.Grad." block be transposed as the following picture.

Again, run the "videogradfiltraspi" mode.

It is verified that the hue component of the output (gradient direction) is revised.
Hereafter, remove the "To Video Display" block because it is temporarily inserted.
[ Top ]
Preparation of Stand Alone Execution
Let us run the model on Raspberry Pi.
In order to execute Simulink models on Raspberry Pi, there are two ways.
- External mode simulation,
- Stand alone execution
In the external mode, a part of Simulink model is executed on Raspberry Pi after code generation and the output is monitored on Simulink.
On the other hand, the stand alone mode executes the code generated from the Simulink model on Raspberry Pi independently.
Prepare Raspberry Pi model B/B+ or 2 and connect the following items
- MicroSD card
- LAN cable
- Web camera (or Raspberry Pi Camera Module)
- Power (USB) cable
in the list order.


Here, it is assumed that MicroSD has already been written a firmware image from the Raspberry Pi Support Package.
- [Tools] > [Run on Target Hardware] > [Update Firmware... ]
See the following site for using Raspberry Pi Camera Module
http://www.mathworks.com/matlabcentral/answers/122199-simulink-with-raspberry-pi-camera-capture
Next, prepare for connecting Simulink to Raspberry Pi.
From the menu bar of the Simulink model "videogradfiltraspi", proceed to
- [Tools] > [Run on Target Hardware] > [Options]

Choose "Raspberry Pi" as the target hardware.

Check the information of the board to be connected.

In particular, "Host name" of "Board information" is different for each board, it should be edited.
- Ask the necessary information for your network administrator.
Once the IP address is known, it can be edited as follows, where 192.168.11.2 is an example.

Complete the preparation by clicking the "OK" button.
[ Top ]
External Mode
Run the Simulink model "videogradfiltraspi" in the external mode.
Change the simulation mode from "Normal" to
- External

Run the model.

Video acquired the camera connected to Raspberry Pi is processed and the output would appear on Simulink.
[ Top ]
Stand Alone Execution
Now, let us run the Simulink model "videogradfiltraspi" on Raspberry Pi only.
The stand alone execution requires the following preparation.
- Unplug the power cable
- Plug HDMI display
- Plug the power cable again

If the peripherals are rightly connected, one can see the startup screen of Rasbian on the monitor connected to the target Raspberry Pi.
Return to the Simulink model "videogradfiltraspi" and click the button
- "Deploy to hardware"

The command window of Windows OS will appear and the message
- "Model is successfully deployed on 'Raspberry Pi'"
will be displayed at the left bottom part of the Simulink model.

The result will be displayed on the monitor connected to Raspberry Pi.

After the deployment, the process on the Raspberry Pi continues even thought the Simulink model "videogradfiltraspi" is closed.
close_system('videogradfiltraspi')
From MATLAB's command window, by using the RASPBERRYPI function, one can get the information on the connected Raspberry Pi.
h = raspberrypi
In order to stop the running "videogradfiltraspi" model on Raspberry Pi, one can use STOP method as follows.
h.stop('videogradfiltraspi')
One can restart the model "videogradfiltraspi" by opening the model again and use the RUN method.
open_system('videogradfiltraspi')
h.run('videogradfiltraspi')
[ Top ]
Exercises
Exercise 6-1. Sobel Gradient Filter
Run the "videogradfiltraspi" model by changing the filter kernel to the Sobel kernel introduced in Exercise 4-1 in the stand alone mode.
Exercise 6-2. Model Creation and Deployment (Option)
Create a new video processing model by yourself and deploy it on Raspberry Pi as a standalone application.
The followings are a list of expected extension examples.
- Raspberry Pi Camera Module Control
- Fixed-point Implementation
- Parallel Implementation (for Quad Core on RasPi2)
- Detection & Recognition of Objects
- Speech & Audio Signal Processing
- GPIO/I2C Controls
- Network Application Development